Garden adjustments in preparation for a wider garage

TransAmDan

Forum Admin
Staff member
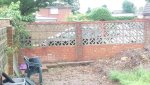
Well this is going to be a fairly long term project. My plan is to build a shed on a concrete base, the mud from the base of the shed will make a raised flower bed. The brick outhouse at the end of the garden, (shown just below the Trans-Am in the photo) has a few garden tools in it, so need a shed to house these items and the BBQ. So then this outhouse can be knocked down to widen the driveway, once the drive way is widened, then widen the garage.
house.jpg

The shed base is complete, and power is running to it.

Just popped out at lunch today and ordered the wood from Goodwillies (the local saw mill) Delivery for Friday 14th Oct. The size of the shed will be big enough to store the bikes with an anchor point to the ground. Will also put a desk in it, so can do soldering etc out there. There will be a window too, also planned in hanging points for hanging baskets and bird feeders, so nice to have a window, may be able to get close to birds.

The shed will be double skin, using tongue and grove 25mm on the outside screwed to a 2 inch thick wooden frame, in this frame there will be some form of insulation, perhaps polystyrene. Then on the inside it will be finished with 19mm thick tongue and groove. All outside wood and frame will be treated as being assembled. The inside will probably be varnished. LED spot lighting inside with the security light in the porch area, yes it will have a porch. This is so you have shelter if raining while opening the shed.

Progress photos and plans to come. ...

Notice Sarahs Camaro on the road in the photo. Well this will be coming out again, just got soo many thing to get done, widening the drive way to get the vehicles off the road will certainly help.
 
Last edited:
Looking forward to this ;)
 
Well the garden started out something like this towards the end of last year. The corner of the garden was a compost heap. This has to be sorted though, and weeds/brambles got rid of.
attachment.php
IMAG1726.jpg


In this pile of dirt, were many bones, like cattle. Plus this pile of bricks. Loads were in there berried at different levels and tangled with bramble roots.
attachment.php
IMAG1728.jpg


Pile in the corner getting lower, odd concrete slabs in there too.
attachment.php
IMAG1729.jpg


Lots of concrete underneath too.
attachment.php
IMAG1744.jpg


Most of the stuff above ground is gone now.
attachment.php
IMAG1745.jpg


Had to move the compost bin to the other corner of the garden. i knew Larry (Larry the legless lizzard) was about and likes to sleep in there, so took care to move him.
attachment.php
IMAG1871.jpg


A lot of mud stripped away, giving a bit of depth for the shed base.
attachment.php
IMAG1976.jpg


attachment.php
IMAG2149.jpg


attachment.php
IMAG2641.jpg


Mains cable run in, that in a metal flexible conduit, this will be under the concrete and pops up just where I need it. Board around the edge put in place, and rubble packed in. Path to the shed also ready.
IMAG2045.jpg
attachment.php


Kev with the 90's mustang does a lot of building work, and done the mixing for me, and I went up and down the garden with the wheelbarrow. Kept me busy, and good exercise. Quite enjoyed doing that. At least there was an expert mixing it all up.
attachment.php
IMAG2046.jpg


Although quite a bit of dust floated around and stuck to the car, gave it many washed after to clean it all off.
attachment.php
IMAG2048.jpg


Almost done.
IMAG2049.jpg
attachment.php


All done.
attachment.php
IMAG2050.jpg


Spotted a pidgeon walking across it, leaving its mark. At least it wasn't a cat.
attachment.php
IMAG2051.jpg
 

Attachments

  • IMAG2641.jpg
    IMAG2641.jpg
    5.4 MB · Views: 3
Last edited:
Picked up the window today, fitted int he Trans-am okay, well just about.

Windows is 1200mm wide, and about 1160mm high. Any taller I would have hod to make changed, but i can make this work. I got it at a bargain price as the window company made it the wrong size for a customer, so they have no use for it, and waiting for someone like me to take it off their handys.
attachment.php
IMAG3156.jpg
 
Last edited:
I have 6 LED lights for the ceiling of the shed, only 4 pictured here.
attachment.php
IMAG3160.jpg

Will need to drill out at 70mm dia hole and pop these in. Each light has its own step down transformer, and needs mains running to each one. I hummed and ar'ed about mains, as I could run them from 12V, but really need a local constant current source which the little PSU's do all that. So will route mains around in the ceiling. I will have an RCD on the end of the cable, and a distribution box.
Testing the lights at work so i can monitor temperature. The heat sink gets to around 35deg C while being on for a few hours. The ceiling of the shed wont have a lot of air flow. At least at this low temperature there shouldn't be much trouble. If it was over 50deg C, I would be concerned.

Looking forward to installing these.
 
Last edited:
A sneak peak of the shed plans. Done it on multiple layers, so the inner frame and outer skin are separate. Also have sketched where the window will go (not show on these outputs) and worked out the best way to lay the roof boards so it gives the right lengths for the floor at the correct spacing for support.

attachment.php
Shed Plans_skin.jpg


attachment.php
Shed Plans_no_skin.jpg
 
Last edited:
Wood for the shed being delivered.
IMAG3174.jpg
attachment.php

attachment.php
IMAG3175.jpg

Used its crane arm to lift it over the tree into the front garden. Couldn't get it into the back garden as the silver car was in the way.

Put the 8ftx4ft boards stright int he house as wont be needing them today, as its probably going to rain overnight.
attachment.php
IMAG3177.jpg

Also the tongue and groove wont be used today, so that went in the lounge/dining room too. 4.8 meters long.

attachment.php
IMAG3178.jpg

2x2inch and 2x3inch wood. Also the 4inch square, for the corners, and some left over for a fence later on.

Starting to put together the floor frame, coating in creosote as I go along. As wont be able to get to these bits later on.
IMAG3179.jpg
attachment.php


Starting to screw it together.
attachment.php


Well that's all I'm going to do today. Looking forward to getting some verticals up tomorrow.
Bringing in all untreated wood, all fits in nicely.
attachment.php
IMAG3181.jpg
 
Last edited:
First start in the morning was to start getting up some vertical posts.
attachment.php
IMAG3182.jpg


Adding some boards to stabilise the uprights. Kev left these behind from concreting the base.
attachment.php
IMAG3183.jpg


Same for the rear posts to.
attachment.php
IMAG3184.jpg


Now to start doing the beams along the top, these beams will be repeated 6 times.
IMAG3185.jpg
attachment.php


Overhand at the front, to provide shelter outside of the shed for unlocking/locking.
attachment.php
IMAG3186.jpg


attachment.php
IMAG3187.jpg

Sarah got a photos of me putting in some screws/
attachment.php
IMAG3188.jpg


attachment.php
IMAG3190.jpg


Well that's it for tonight.
attachment.php
IMAG3191.jpg
 
Last edited:
done well so far why not have door open againt wall instead of garden side ?/
 
Added in some diagonal pieces for strength
attachment.php
IMAG3199.jpg


attachment.php
IMAG3200.jpg


Temporary supports removed, and added in vertical centres ready for roof beams
attachment.php
IMAG3202.jpg


Impressed myself with a notch cut out. Looking the business.
attachment.php
IMAG3203.jpg
 
Last edited:
Come on Dan how are the birdies ment to get in there nest box home so thought less you are :becky:
 
That little box is a bug breading thing to feed the birds. i will move that to the front of the shed. Not many bugs in it at the moment, think the birds have picked them all off.
 
Creosoted the roof frame.
attachment.php


During the week, only had little time in the evenings, manage to get some metal braces in place.
attachment.php

They probably not needs, but I like to go over the top a bit. This is in aid of string winds, that is wind gets under the roof, you could effectively lift the whole shed and it would all stay in one piece.

Saturday the roof will be going on, so needed to prepare the edges of the roof board. The two sides will but together in the middle, but wood is cut 90 degree's, I want the two pieces to be flush,m so cutting 13 degrees slant.
attachment.php


Now to cresote all 4 panels.
attachment.php

Managed to get all 4 done before it got too dark. These will be the whole pieces for the roof, there will be some extra bits up there to cover the lot. I'll creosote them too before putting up. Smells good.
 
Saturday morning it was time to start putting the roof panels on.
attachment.php


attachment.php


Pretty heavy sheets, these ones above could be slide on from the edge. The ones below were a tad heavy to lift over my head to slide on the end. Managed it just.
attachment.php


attachment.php

Adding sealant to the butting edges.

attachment.php

Good view from up here. Good to know its strong enough too.

attachment.php


attachment.php

Wow, its looking the part now.

attachment.php

Looks nice on the inside.

attachment.php

Creosoting the roof boards that will go down each edge.

attachment.php

I have some roof sealant and filling in all the gaps/joins.

attachment.php

Roof all in place, and added some T&G board to the back of the shed.

attachment.php

Not to add some coating to the boards.
attachment.php


attachment.php

View from the bedroom window, the roof looks quite large.

Siunday was the day to start adding the roofing felt. I brought some tar like adhisive/sealent to paint on the roof, it was a little cold, and although you dont need to heat it up, its quite stiff with a pain brush. The sun warmed it up.
attachment.php

Used takes to hold it down, and could see the tar oozing out, making a good waterproof seal.
attachment.php


Will be adding wooden battons around the edge, its just tacked for now.
attachment.php


Been itching to get the window in. So Here it is, floating in the air.
attachment.php


attachment.php


Adding in some T&G for the bottom.
attachment.php


Nicely meeting the cornet post, and adding in plenty of stainless steel screws to hold the planks on. I creosote the planks before assembling them, then in know treatment is in the gaps.
attachment.php


Coming together rather well. Looking back on this over the last two days, 10 hours works, its come on a long way.
When I got in tonight i was outside with a head lamp, creosoting inside and out of these planks.
 
Looking good dan, worth the hard work
 
Photos from the 25th October.

attachment.php


attachment.php

Tapping the T&G down with Timmy.

attachment.php


attachment.php


attachment.php
 
Friday 28th was good progress. Took the day off work for finished the short back face, and build up the long back face.

attachment.php


attachment.php


Screws popped in ready to be driven.
attachment.php


All in up to the top, well one board away from the top, as each one needs to be cut around the roof support.
attachment.php


So now to finish off the short back wall.
attachment.php


Some rather sharp angles needing to be cut. All going well.
attachment.php


attachment.php


Well that's enough for today, back on it in the morning.
attachment.php


attachment.php
 
Sunday 29th October.

The two back sides left over from yesterday have been coated now.
attachment.php


Now to start building up to the left of where the door will go.
attachment.php


attachment.php


attachment.php


attachment.php


attachment.php


attachment.php
 
Made some more progress today, 30th October

Starting to put the glass in, large one is now in.
attachment.php

Started with the larger one as I know the trim that secures the glass in can be a bit tough, the longer ones should be easier. So started with the big one to get the hang of it.

All glass fitted.
attachment.php

Fitted the handles too. All working well.

I now need a door, so starting to make the frame. i have 4 hingest, was just going to fit 3 as as they game in pairs, may aswell stick all 4 on, therefore will need 4 horizontal beams.
attachment.php


4 horizontal beams there, and checking door frame for fitment.
attachment.php


Its need more strength. although not moving at the moment, but over time it could sag. So lets add some diagonals.
attachment.php


Ready for some Creosote. and start to put on the panels.
attachment.php

I was going to put vertical panels but I didn't have enough lengths left. So going horizontal. Which means I'm going to have to try to get them to line up with the rest of the shed. So all measures up and starting to add the panels.
Looks like I need more wood.
 
So thats where all the trees have goone in portsmouth
 
Back
Top